Banana Cupcakes with Honey Peanut Butter Frosting and Chocolate Filling

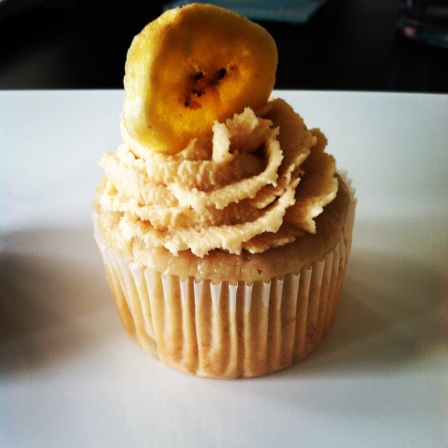
Phew! What a name. But really these cupcakes have so much going on that I couldn’t help but put a crazy long label on them. They earned it.

photo 4

Ohhhh man are these good. Banana and peanut butter. Banana and chocolate. Chocolate and peanut butter. Peanut butter and honey.  No matter which way you look at it, the combination of flavors here is classic and like, the best ever.

photo 3

The banana cake is my favorite recipe. It’s dense and super banana-y, but still sweet like cake should be. It has Chobani in it, so obviously it’s healthier and awesome-er than regular banana cake. Also, is adding hyphens and letters on to the ends of words a thing? If not, I’m making it one.

photo 2

This peanut butter frosting is my go-to recipe and has been for years. This time I made it a million times better by using the Bee’s Knee’s flavor from Peanut Butter & Co and a little extra honey. The remainder of the jar is now gone. I literally can’t be controlled around peanut butter.  Oddly enough, there was no left over frosting, either. Weird.

photo 5

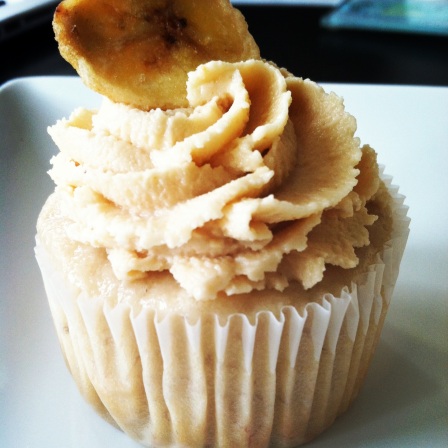
The ganache is an awesome little surprise in the middle. You could totally make these without it and they’d still be divine, but, really, if biting in to a banana peanut butter cupcake and finding chocolate in the middle doesn’t make your day, something’s up…

photo 1

I went the extra mile with these and drizzled honey on the top.

photo 3

Don’t judge me. It was perfect(-er).

photo 4

Cue the drool.

Recipe

Prep time: 10 minutes | Bake time: 30-45 minutes | Total time (with cooling and frosting): approximately 2 hours.

Yield: 18 cupcakes

Banana Cupcakes

  • 1 cup plus 1 tbsp granulated sugar
  • 6 tablespoons butter at room temp
  • 1 egg plus 1 egg white
  • 1 tsp vanilla
  • 1 ½ cups all purpose flour
  • 3/4 tsp baking soda
  • Dash of salt
  • ¾ cups Greek yogurt (I used Chobani, duh)
  • 2 tbsp apple butter
  • 2 overripe bananas, mashed

Peanut Butter Frosting

  • 2 ½ cups confectioners sugar
  • ¼ cups butter at room temp
  • ½ cups creamy peanut butter (I used Peanut Butter & Co. Bee’s Knees)
  • 1 tsp vanilla
  • 1 tbsp honey plus extra for drizzling

Chocolate Ganache

  • 1/2 cup chocolate chips
  • 1/2 cup heavy cream

Preheat oven to 275 º F. Line cupcake pans with liners, enough for 18 cupcakes. In a stand mixer, whip together butter and sugar until light and fluffy, about 2 minutes. Add in egg and egg white and mix until combined. Add in vanilla, then the yogurt, apple butter and bananas. Mix until homogenous. In a separate bowl, sift together flour, baking soda and salt, then slowly add it to the wet ingredients. Mix until just combined, scraping down sides of the bowl if needed.

Fill cupcake liners about 2/3 full with batter. Place on middle racks in oven and bake approximately 30-35 minutes or until a toothpick inserted in to the center comes out clean. Remove from oven and immediately place in freezer to stop the baking process. Let chill in freezer for approximately 30 minutes.

In the meantime, make the peanut butter frosting. In the bowl of a stand mixer fitted with paddle attachment, simply combine all the ingredients together, whipping on high speed for approximately 5 minutes, scrapping down sides intermittently.

For the ganache, place both ingredients in a small saucepan. Over very low heat, melt together, stirring constantly. Remove from heat as soon as the chips have melted (this is very important to avoid burning the ganache- burnt ganache= bad). Set aside to let cool.

To assemble, first hull out the middle of each cupcake. Here’s a great tutorial on how! Next, spoon about a teaspoon of ganache in to the hole (or more depending on the size of the hole you’ve created, you want to fill these babies up!). Spoon the frosting in to a piping bag fitted with the piping tip of your choice (or a large plastic baggie with a corner cut off!). Generously pipe the frosting on to each cupcake, there should be plenty to go around! Share the wealth! Drizzle a little bit of honey on to each cupcake right before serving. It just makes them even more awesome-er.

Cupcake adapted from The Novice Chef. Frosting and ganache are Life Love Lemons originals :).

Peanut Butter and Pretzel M&M Cookies

I’ve been on a cookie tear lately. Have you noticed?

photo 3

It’s mostly because cookies are awesome. They’re super easy to throw together and when you show up pretty much anywhere with cookies, everyone thinks you’re really cool.

photo 4

Especially when your cookies are as fun as these. I don’t know if you guys have ever tried the Pretzel M&M’s, but they’re freakishly addictive. Paired with peanut butter, they’re out of this world.

photo 2

In cookie form, they’re kind of orgasmic. I’m not kidding.

The cookies are soft and sweet, the pretzels and M&M’s are crunchy and salty. These things have this crazy flavor-texture thing going on that makes your mouth sososo happy.

photo 3

Seriously, you guys, these things are totally worth trying, especially if your a cookie beginner. All you do is put this stuff in one bowl, mix it up, and you’re done. Your tastebuds will thank you.

photo 1

Nomnom.

Recipe

Prep time: 10 minutes | Bake time: 10 minutes | Total time (with cooking): 40 minutes

Yield: about 18 large cookies

  • 1/2 cup smooth peanut butter
  • 1/2 cup butter, room temperature
  • 1/2 cup brown sugar
  • 1/2 cup granulated sugar
  • 1 teaspoon vanilla
  • 1/2 teaspoon baking soda
  • 1 1/4 cup flour
  • 3/4 cup pretzel M&M’s, crushed
  • 3/4 cup mini chocolate chips
  • Pretzels to top

Preheat oven to 375 ° F. In a large bowl, simply mix the butter, peanut butter, sugar, vanilla, baking soda and flour until well combined. Fold in the M&M’s and chocolate chips. Scoop out about 1/4 cup of dough, roll in to a ball, place on cookie sheet and flatten slightly with the palm of your hand. Top with pretzel pieces. Repeat until all the dough has been used up. Bake for about 10 minutes, until the edges are slightly golden and the middle is still soft. Remove and let cool on tray for 10 minutes, then transfer to wire rack and let cool completely. Devour.

Thai Chicken Pizza

I love pizza.

photo 3

If you don’t, you’re totally weird. I mean, we can still be friends and all, but come on, no pizza?!

photo 2

Maybe I could sway you with this creation. It’s definitely pizza because it’s a bunch of delicious ingredients baked on a crust (and I’m quite sure that’s the only existing pizza parameters). But it’s also Thai food, and everyone likes Thai food. (If you don’t like Thai food or pizza, something’s wrong… I mean that.) This dish is pretty much a combination of two of the best food groups out there.

photo 3

Thai Chicken Pizzas seem to be popping up on fancy pizza menus everywhere, and with good reason. They’re healthy (look at all those veggies!), have protein (chicken + peanut butter = tons of protein) and are soooo pretty (ooooohh, colors!). A readymade crust makes it easy to put this together for a weeknight dinner. With all the deliciousness piled on top, this was definitely satisfying for a small group.

photo 4

To all the pizza lovers out there (holler): I think you’ll be super pumped about this dinner. And to the pizza haters (really, who are you?!): you don’t know it yet, but I’ve just made a convert out of you. You’re welcome :).

photo 1

Recipe

Prep time: 1 hour 15 minutes (mostly idle): Bake time: 10 minutes

Thai Chicken

  • ½ lbs chicken breast
  • 1 tbs creamy peanut butter
  • 2 tsp soy sauce
  • 1 tsp sesame oil
  • 1 tsp red wine vinegar
  • ¼ tsp ground ginger
  • ¼ tsp ground garlic

Thai Sauce

  • 3 tbs creamy peanut butter
  • 3 tsp soy sauce
  • 2 tsp sesame oil
  • 1 ½ tsp red wine vinegar
  • ½ tsp ground ginger
  • ½ tsp ground garlic
  • ½ tsp red pepper flakes
  • Water to thin, if necessary

Pizza

  • 1 Pizza Crust, prepared (I used Rustic Crust, but you can use whatever kind you’d like!)
  • ½ to ¾ cup mozzarella, freshly grated
  • ¼ cup shredded carrots
  • ¼ cup shredded red cabbage
  • ¼ cup green onions, finely chopped
  • ¼ cup peanuts
  • 1 tbs red pepper flakes, to taste
  • Thai chicken, prepared (see above)
  • Thai peanut sauce, prepared and divided (see above)

For the chicken:

Whisk together all of the ingredients. Place the chicken in a bowl and pour the marinade over the chicken. Let sit for at least an hour.

Heat a sauté pan over medium heat, and add a little oil to the bottom of the pan. Add the chicken and call the marinade to the pan and sauté until cooked through, about 5 minutes on each side. Remove the pan from heat and, in the pan, shred the chicken, making sure to coat the chicken with as much marinade deliciousness as possible. Set aside.

For the Thai Peanut Sauce:

Simply whisk all the ingredients together until thoroughly combined. You want to be able to spread this over your crust and drizzle it over the pizza at the end, so add water in small amounts if it seems too thick!

Pizza assembly:

Preheat your oven to 400 ° F. Spread about half of the thai peanut sauce over you crust. Sprinkle ½ cups mozzarella over the sauce. Evenly distribute the chicken, then the carrots, cabbage, and green onions over the crust. Do the same with peanuts and, finally, the red pepper flakes. Place in oven for about 10 minutes, until cheese is melted and edges of the crust are slightly browned. Remove and drizzle the remaining thai peanut sauce over the pizza.

Cashew and Quinoa Vegetarian Thai Salad

This salad.

photo 3

Holy crap, this salad.

photo 2

No matter how eloquently I describe it, I will not do it justice. I just can’t. Because, really how does one describe the most perfect salad to ever be eaten, ever? Look at it! It’s crunchy, full of flavor, and those colors are so gorg. I brought it to a dinner and it was huuuge hit.

photo 5

Then, just when I thought this thing couldn’t get any better, I had it for lunch the following day. The flavors had all blended together and it was even more delicious. Seriously, I’ve been in salad heaven over here.

The ingredient list is lengthy, but it is really so easy to put it all together (most of the dressing ingredients are pantry staples!). And if you’re nervous about quinoa, just go with it. It’s a healthful and flavorful seed that cooks up as easily as rice, and is sooo a thing right now. This is the type of dish I see myself making again and again.

photo 3

You’ll love it. Trust me, I’m a nurse.

Recipe

Prep Time: 25 minutes

Yield: 6-8 servings

Salad

  • ¾ uncooked quinoa
  • 1 ½ cup vegetable broth
  • 2 cups shredded red cabbage
  • 1 red bell pepper, diced
  • ½ red onion, diced
  • ¼ cup cilantro, chopped
  • ¼ cup diced green onions
  • ¾ cup cashew halves (I used a cumin flavored variety- it was delish)
  • ½ cup shelled edamame
  • ½ cup chickpeas
  • Juice of 1 line

Dressing

  • ¼ cup creamy peanut butter
  • ¼ teaspoon ground ginger
  • 3 tablespoons soy sauce
  • 1 tablespoon honey
  • 1 tablespoon red wine vinegar
  • 1 teaspoon sesame oil
  • 1 teaspoon olive oil

Rinse quinoa in cold water and drain. In a medium sized pan, add quinoa and vegetable broth. Bring quinoa and broth to a boil, then reduce to simmer and cover, letting quinoa absorb all the liquid. Remove from heat and let cool for 10 minutes.

For the dressing, simply whisk all the ingredients together until thoroughly combined.

In a large bowl, stir together the quinoa and the dressing. Gently mix in the cabbage, pepper, red and green onions, cilantro, edamame and chickpeas. Add the cashews, saving a few for garnish. Add the lime juice and give the salad one last stir.

Serve warm, cold, room temp, whatever! It’s going to be amazing no matter what.

Adapted from Ambitious Kitchen.